FoCal Pro Settings
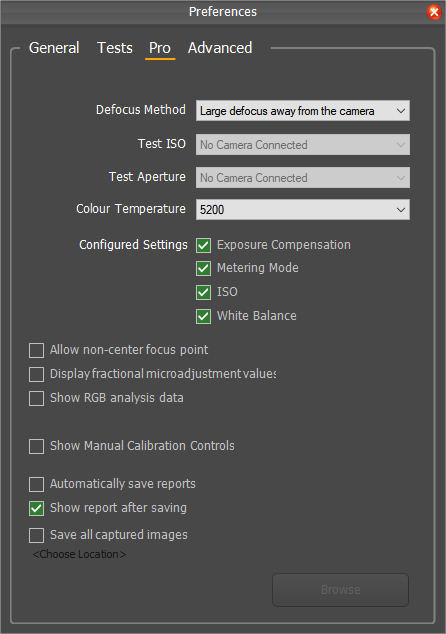
Defocus Method
This option allows you to change how the camera is defocused before taking a shot.
Test ISO
When a camera is connected, you can adjust this value to instruct FoCal to use a specific ISO for testing.
Typically, you should leave this at the base ISO (ISO 100 for most cameras, but some older Nikon cameras have a base of ISO 200, and some new cameras a base of ISO 64).
There are certain situations where you may wish to increase the ISO, but bear in mind the following:
- The noise in the image will increase. With modern cameras and FoCal’s analysis, this will not typically adversely affect the analysis results up to around ISO 1600, but above this level you may see inconsistent results. It’s important to understand that the results may be sub-optimal.
- Increasing the ISO will allow the use of a faster shutter speed which will allow you to analyse in lower light levels. However, there is no change to sensitivity of the AF system, so running with not enough light will still produce results that are not necessarily representative of how the camera should behave.
Test Aperture
By default, FoCal will calibrate at the widest aperture – and this is almost certainly what you want.
For most cameras*, autofocus will be performed with the aperture wide open irrespective of what setting you use for capturing the image. When you half-press the shutter button, the camera will open the aperture wide to allow the most light to hit the AF sensor, and to have the shallowest depth-of-field for more accurate focus determination.
Adjusting this setting changes the aperture at which FoCal takes the shot – again, to reiterate the above, this setting does NOT change the aperture at which the focus operation is performed.
Changing this setting can be useful to see how different (wide-open) calibration results affect the image quality when shooting at the specified aperture. You should be very careful to confirm the calibration results with real-world shooting if your calibration is performed with the aperture at anything other than wide-open.
(* for mirrorless camera and live view shooting, this is not necessarily the case but there is no general rule as it depends on the camera and the camera settings as to whether the aperture is adjusted for focusing).
Colour Temperature
This setting adjusts the colour temperature of the shots taken by the camera. This does not affect analysis in Raw mode.
Configured Settings
The following settings are configured before a test is run, but by un-ticking the options FoCal will NOT adjust the value. For advanced users, this offers the opportunity to try testing with various non-default settings.
- Exposure Compensation
- Metering Mode
- ISO
- White Balance
So, for instance, if you wanted to run the test with your own selected exposure compensation, you would untick the Exposure Compensation – meaning FoCal will now NOT configure this setting – and set the Exposure Compensation to where you would like it before you ran the test. FoCal will then not make any changes to this setting during testing.
Allow non-centre focus point
Most testing with FoCal uses the centre focus point and if the camera is set up to use any other focus point you will see a warning and not be able to run the test. If you tick this option, you can then run tests at different focus points.
Note that this is an advanced feature and you should understand the consequences of not using the centre focus point before testing at other points.
Display fractional microadjustment values
The internal calculations within FoCal can resolve microadjustment values very precisely. However, cameras only allow setting of whole-number microadjustments so there’s usually no point in displaying with a precision greater than 1 unit.
If you tick the Display fractional microadjustment values option, the results will be shown to 1 decimal place.
Show RGB analysis data
FoCal performs analysis on the red, green and blue colour channels in order to determine a final general result. If you tick this option, you will see the R, G and B results shown on the charts.
Show Manual Calibration Controls
The fully automatic calibration test offers the ability to manually specify the tested range, step size and amount of shots per microadjustment value. Because these controls are for advanced users, they are usually hidden. Tick this option to display the manual controls.
Automatically save reports
With this option set, FoCal will automatically save reports after testing.
Show report after saving
With this option set, FoCal will start the default viewer after a report is saved.
Save all captured images
Tick this option and choose a folder if you would like all images that FoCal captures from the camera to be saved to your computer.
Test Settings | This Page | Advanced Settings