Autofocus Performance Information for the Nikon Z7ii
Z mount
10% of lenses would benefit noticeably from FoCal calibration, with 0.7% showing a significant improvement.
Source: FoCal IQ: Z7ii (Z mount)
F mount
57% of lenses would benefit noticeably from FoCal calibration, with 10% showing a significant improvement.
Source: FoCal IQ: Z7ii (F mount)
Definitions:
FoCal Support for the Nikon Z7ii
Check your autofocus performance for free with FoCal Mobile or dig deep into your gear with FoCal Pro.
Supported Features
 Automatic Focus Calibration
Automatic Focus Calibration is available for this camera, offering Wide & Telephoto Adjustment
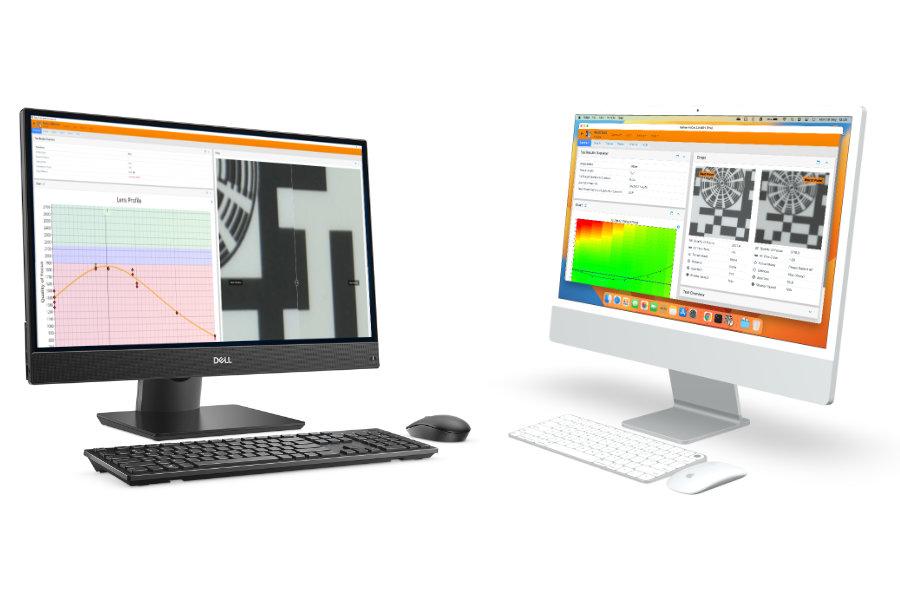
The Focus Calibration tool in FoCal will tune your Nikon Z7ii and lenses to work as well as possible together. A full calibration takes a few minutes, after which you will be able to see the before/after images and, with FoCal Pro, dig into the measurements.
Your Nikon Z7ii will run in User Assisted Mode. During a test, you will be asked to change the AF Fine-Tune value a few times - see the section below for more details.
 Calibration check
 Calibration Check is available for this camera.
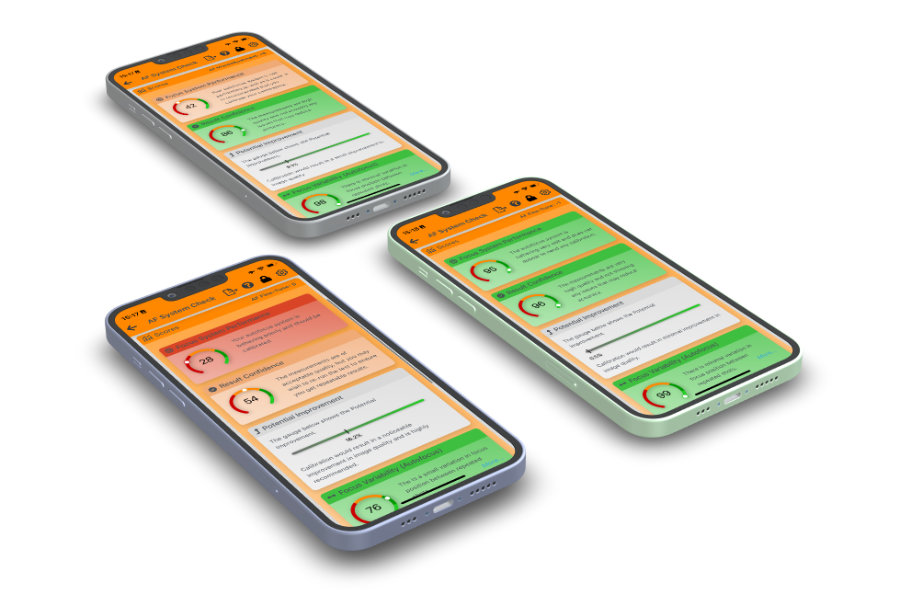
Calibration Check is a one-click tool for checking the current state of your Nikon Z7ii and lens operation. In a minute or so, it will give you a result showing whether your kit is working optimally or could benefit from tuning.
Calibration Check (AF System Check) is completely free in FoCal Mobile!
 MultiTest
MultiTest is available for this camera.
MultiTest gives you a two-dimensional view of your lens performance. See how your lens performs at different focus positions across the aperture range, revealing any focus shift as the aperture changes, showing the very sharpest aperture, and understanding just how much benefit calibration and manual-focusing will be for you.
 Stabilisation Test
Stabilisation Test is available for this camera.
How does your stabilisation system really perform? With the Stabilisation Test in FoCal, you can investigate the benefit of your camera and/or lens stabilisation system. See the quality improvement as the shutter speed slows, and investigate whether stabilisation when tripod-mounted can actually degrade the quality.
 Focus Consistency
Focus Consistency is available for this camera.
With the Focus Consistency tool, you can investigate how repeatable your Nikon Z7ii autofocus system is. Choose to defocus between shots in one or both directions, and compare viewfinder (phase-detect) and Live View focusing.
 Aperture Sharpness
Aperture Sharpness is available for this camera.
What happens to your image sharpness as you change aperture on your lens? With the Aperture Sharpness tool in FoCal, you can find out!
 Dust Analysis
Dust Analysis is available for this camera.
Take a good look at your Nikon Z7ii sensor with the Dust Analysis tool. Quantify the dust spots - see how many there are and how much of an impact they will really have on your sensor before you decide to embark on a costly and potentially risky clean.
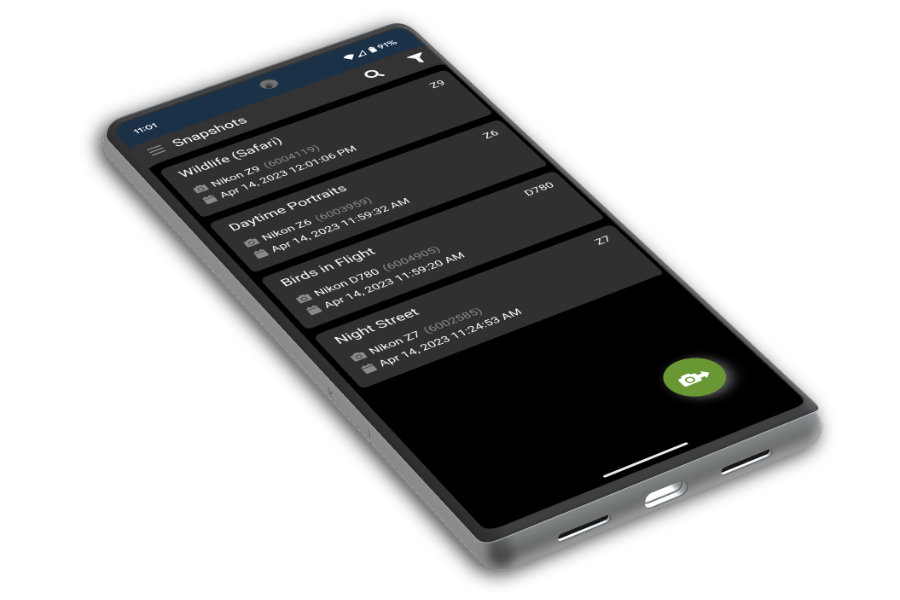
The Snapshots feature is available for this camera.
The Snapshots tool lets you grab a snapshot of your Nikon Z7ii configuration - hundreds of settings all captured and ready to restore and share. Build a library of your favourite camera setups - night shooting, birds-in-flight, portraits - and configure your camera in seconds.
Using FoCal with your Nikon Z7ii
Click a heading below for further information.
Connecting to your computer or mobile device
FoCal can take control of this camera via USB in tethered mode.
You can use the camera's built-in WiFi to connect to FoCal wirelessly.
Permissions on macOS
macOS has a strict permissions system which requires you to allow certain operations before FoCal can communicate with cameras.
During your first connection with FoCal, you must allow the following when asked:
- Allow permission to access the Photos Library.
- Allow permission to access the Removable Media.
Both of these permissions are required to allow FoCal to communicate with external cameras.
What to do if permissions are shown as Denied.
FoCal has an option which will reset the application permissions, meaning that next time you start up the application it should re-request.
To reset the permissions, do the following:
- Click the Help menu option and choose Settings.
- Scroll to the bottom of the window, and expand the Advanced panel.
- Click the button for Reset Application Permissions.
- Closedown and restart FoCal - you should then be asked to allow permissions when required.
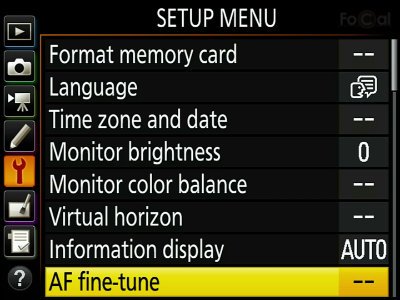
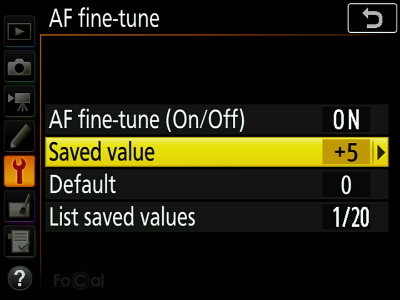
AF Fine-Tune
The option for AF Fine-Tune on the Nikon Z7ii is found in the menu under the option:
By default, the setting will be :
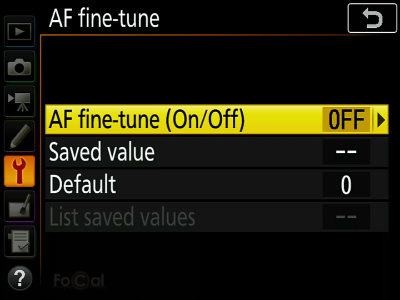
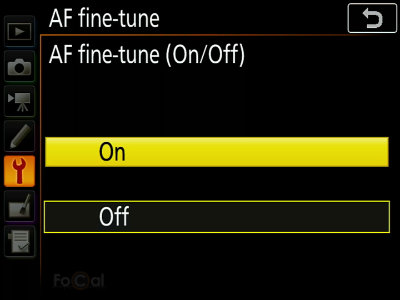
To start with, make sure this is changed to . (This will only have to be done once):
Next, select the or option - this will adjust the AF fine-tune value for the lens that is currently attached to your camera. 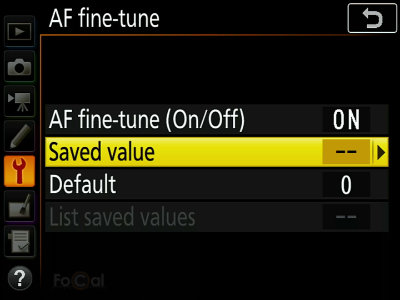 Do NOT change the option away from as this will affect the result for all lenses.
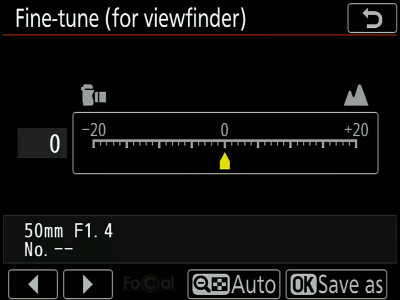
Single focal length (prime) lens:
For a prime lens, you can adjust the value on the screen:
Zoom lens:
For a zoom lens, as instructed by FoCal select or using up/down, then use left/right to adjust the value:
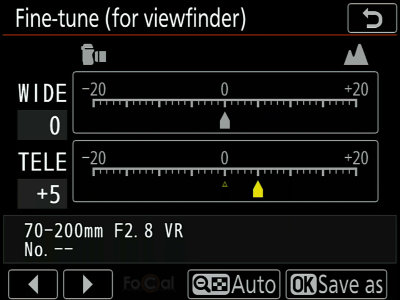
When you have reached the correct value, hit to set the value. This will return you to the previous screen, and you should confirm that the value is shown correctly in the entry:
Continuing
Once the value is set on the camera, you can let FoCal know you're ready to continue.
We recommend using the camera hotkey for this, which is described in the User Assisted Mode section.
About User Assisted Mode
Although FoCal can control the Nikon Z7ii to adjust almost all the necessary settings for testing, the camera does not allow adjustment of the AF Fine-Tune setting over USB.
During Automatic Calibration or MultiTest, you may be requested by FoCal to change the AF Fine-Tune a few times, e.g.:

While this message is shown on the screen, the camera controls will be enabled and you can change the AF Fine-Tune setting on the camera.
By default, Voice Prompts will be enabled, meaning your computer will speak out the change you need. Combined with the Camera Hotkey (see below), this makes changing the AF Fine-Tune option very quick and easy.
Quick Change
It's actually really quick to change the setting on the camera after the first time, as the menu options will be selected from any previous changes.
On Nikon cameras, the sequence is:
- : opens the menu
- : selects
- : selects
- Adjust the value on the screen, then hit to accept
- Action the hotkey as shown below to continue.
Camera Hotkey
In order to make the change of AF Fine-Tune as painless as possible, you can use the camera hotkey feature of FoCal to signal that you have made the necessary change.
Once the change is made on the camera, to use the hotkey, simply:
- Half-press the camera shutter button to return to shooting mode
- Click the appropriate dial by one position to change the aperture or shutter speed
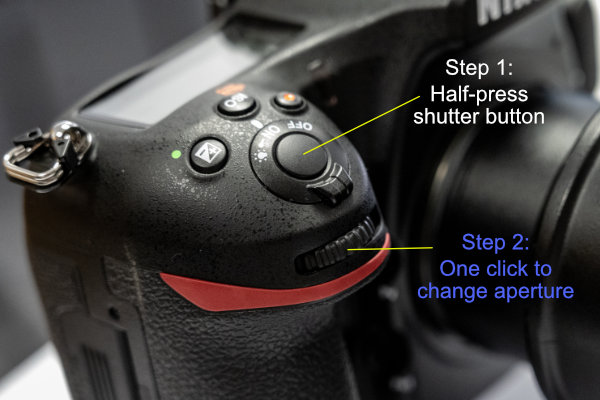
This change in aperture/shutter speed will signal to FoCal that you have made the change. After a short delay to allow the camera to settle, FoCal will take control again, restore the aperture/shutter speed for the test and continue.
Environment Setup
Choose a location with a solid floor
Ground floor locations are less likely to vibrate when people move, trucks drive past outside the building etc. The quality of your test results will be affected if there is vibration to the camera/lens during the test.
Attach the target firmly to a vertical wall at approximately the height of the camera lens
If you print the target yourself, make sure it is flat and cannot blow around during testing. We recommend using a FoCal Hard Target (available from the Reikan FoCal Store) as these are the targets we use for all our development and testing.
Ensure the target is well lit with a stable light source
We don’t recommend the use of fluorescent or LED lighting as they can flicker – you won’t be able to see this with your eye, but the camera can be affected and the results may not be as accurate as possible. Also avoid changeable outdoor lighting - e.g. clouds moving across the sky. FoCal can compensate for small light level changes, but large changes can cause problems during testing.
Attach the camera or lens to a solid, sturdy tripod
If the option is available for your tripod, you can hang something heavy from the hook at the base of the centre column to further stabilise the camera lens during testing.
For large lenses, use the supplied tripod collar and attach the lens to the tripod (not the camera) - this will not only reduce strain on the camera mount, but also make the whole camera/lens system more stable.
Position the camera the appropriate distance from the target
The Target Distance Tool in FoCal will guide you. You can use this either with or without the camera connected to FoCal. More information is available at help.reikanfocal.com/targetdistance.
Connect the camera to the computer
You will require a USB cable with a USB-C connector to connect to your Nikon Z7ii.
Use the USB cable supplied with your camera or a high-quality alternative, and avoid extension cables. Low quality USB cables can cause considerable unreliability during testing and it's usually the first thing we suggest changing if you get unreliable operation of FoCal!
Camera Setup
Check the camera battery is at least half (>50%) charged
Low batteries can cause the tests to run incorrectly or to fail. FoCal can catch and properly identify most issues, but if a battery is low or exhausted the camera may behave unexpectedly and you may see strange behavior.
Remove any battery grip from the camera
Battery grips can cause considerable extra vibration when mounted on a tripod - remove them before you calibrate.
Aim the centre focus point of the camera approximately at the centre of the FoCal Target
You don't have to be too precise - positioning will be confirmed during Target Setup.
Camera Network (WiFi/Ethernet) Setup
Important: You must ensure the WiFi option for Nikon is enabled in the software settings, otherwise the camera will not be detected by FoCal.
In order to enable WiFi on the Nikon Z7ii, go to the menu on your camera and choose :
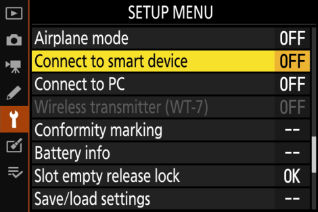
On the next screen, choose :
Then :

After a few seconds, the camera will broadcast a WiFi network and the screen will display the network name (SSID) and the password you should use to connect:
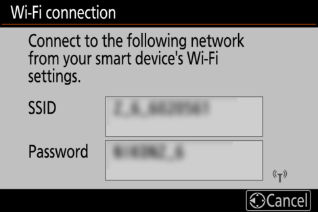
On your computer or smart device, open your WiFi settings and connect to the camera's WiFi network using the password shown on the camera.
Once this is done, you should see the camera as an option to connect to within FoCal software.
Camera Settings
Switch to Photo mode
The Nikon Z7ii can operate in both Photo and Video mode. If there is a selector switch, ensure that it is switched to Photo mode.
Disable WiFi
The WiFi feature on the Nikon Z7ii can interfere with communications with FoCal over USB, so please ensure that WiFi is disabled.
Remove any mode limits
Some cameras allow you to limit available options for various settings. If this is possible on your camera, please ensure that the following are allowed options:
- AE Mode: Aperture Priority and Manual
- Metering Mode: Spot Metering, Matrix/Evaluative Metering
- Aperture: All apertures
- Shutter Speed: All shutter speeds
- ISO: All ISO values
Switch to Aperture Priority Mode
Most tests in FoCal use Aperture Priority mode, so it's a good idea to switch to this mode when you start.
If a tool in FoCal requires a different mode, you will be asked to change.
Select non-continuous Autofocus mode
Ensure the autofocus mode of your Nikon Z7ii is set to .
To check, when you half-press the shutter button, the camera should lock focus (with a beep if this is enabled), and then stop focusing.
Select single focus point mode
You should not use any automatic focus point selection modes. When you look through the viewfinder and activate autofocus (half-press the shutter button or use the AF-ON button), you should see only a single, non-moving AF point selected.
Choose the Centre focus point
Most FoCal tests require use of just the centre focus point, so set that single point (from the step above) to the centre.
Ensure Focus Limiter is disabled on lens (if applicable)
FoCal may use the whole of the lens focus range during testing. You may encounter errors if the range of focus is limited on the lens, so make sure the limiter is set to OFF or the minimum-to-maximum range (note this option is not present on all lenses - it's usually available on longer telephoto lenses or macro lenses).
Ensure any image stabilisation is disabled on lens and/or in-camera (if applicable)
The Nikon Z7ii has in-body stabilisation, so ensure this is disabled.
You should disable any image-stabilisation option on your lens, as it can reduce the quality of the results.
Nikon Z7ii Specifications
| Camera Model | Z7ii |
| Manufacturer | Nikon |
| USB Type | USB-C |
| Expected Shutter Life | 200000 actuations |
| Diffraction Limited Aperture | f/7 |
| Sensor Size | Full Frame: 35.9 x 23.9 mm (858.0 mm²) |
| Sensor Resolution | 8256 x 5504 pixels (45.4 MP) |
| Pixel Size | 4.3µm |
| Sensor Type | Bayer |
| Lens Mount | Z mount |
| Base ISO | 64 |
| CPU Type | Dual Expeed 6 |
| Release Date | October 2020 |
| In-body Stabilisation | Yes |
FoCal Products
Find out more about our suite of camera & lens tools