Snapshot Page
The Snapshot page shows you an overview of a single Snapshot:

- Monitoring indication. When shown, this means the Snapshots app is actively monitoring the camera and will immediately synchronise changes made either on the camera or application. See Camera Monitoring for more information.
- Delete the Snapshot from the database.
- Duplicate the Snapshot – a copy of this Snapshot will be added to the database.
- Export the Snapshot. See Export a Snapshot for more information.
- Back – tap this to return to the Home page. (Note: this will stop Monitoring, see Camera Monitoring for more details).
- The Snapshot Title. Tap to edit. You can enter anything you like here to quickly and easily identify the purpose of the Snapshot – e.g. “Portraits”, “Night Landscapes” or “Basic Copyright”
- Favourite – tap this to mark this Snapshot as a Favourite. This will then allow you to easily filter on Favourites from the Home page.
- Lock – tap this to Lock the snapshot. When locked, you cannot edit the title, notes or any of the Snapshot settings. You will also not be able to delete the Snapshot. Simply Unlock if you want to edit/delete.
- Snapshot Timestamp - this is the timestamp of the last point the Snapshot was modified.
- Camera Information – shows the camera model, serial number and firmware version that the original Snapshot was capture from.
- Notes – you can enter any useful information about the Snapshot here. These are useful to explain the configuration of your camera with this Snapshot, especially if you want to share the Snapshot with others.
- Snapshot Details – tap this button to dig into the settings details. See Settings Groups for more information.
- Apply – this is the button you hit to apply the Snapshot to your camera. For more information, see Apply a Snapshot.
When any part of the Snapshot has been modified, the top bar will show as red and the options in the Snapshot page will be different:
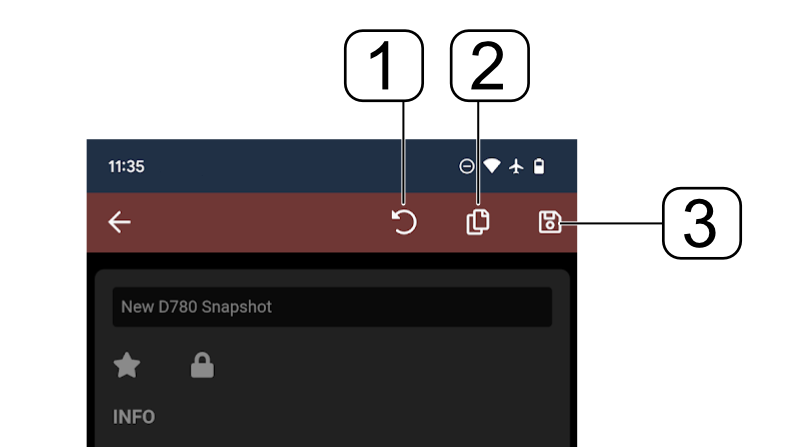
- Undo all changes – this will revert the Snapshot back to how it was on capture from the camera or loading from the database.
- Save a copy – save the modified Snapshot as a new entry in the database.
- Save – update the current Snapshot in the database.
Snapshots Home | This Page | Settings Groups